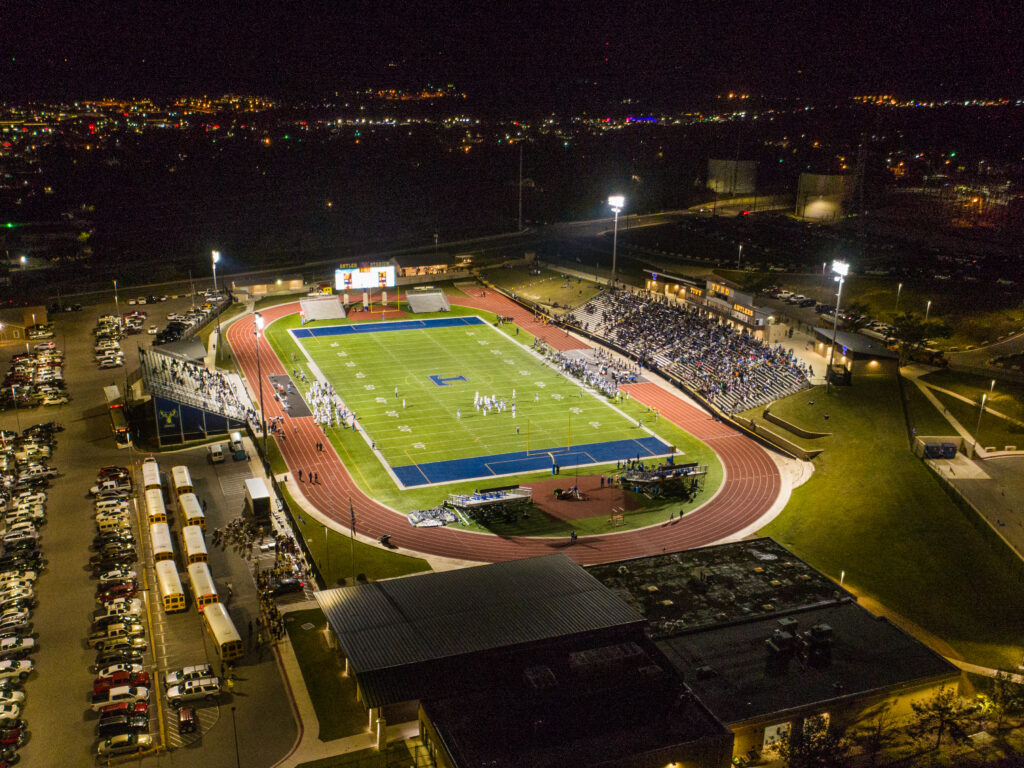
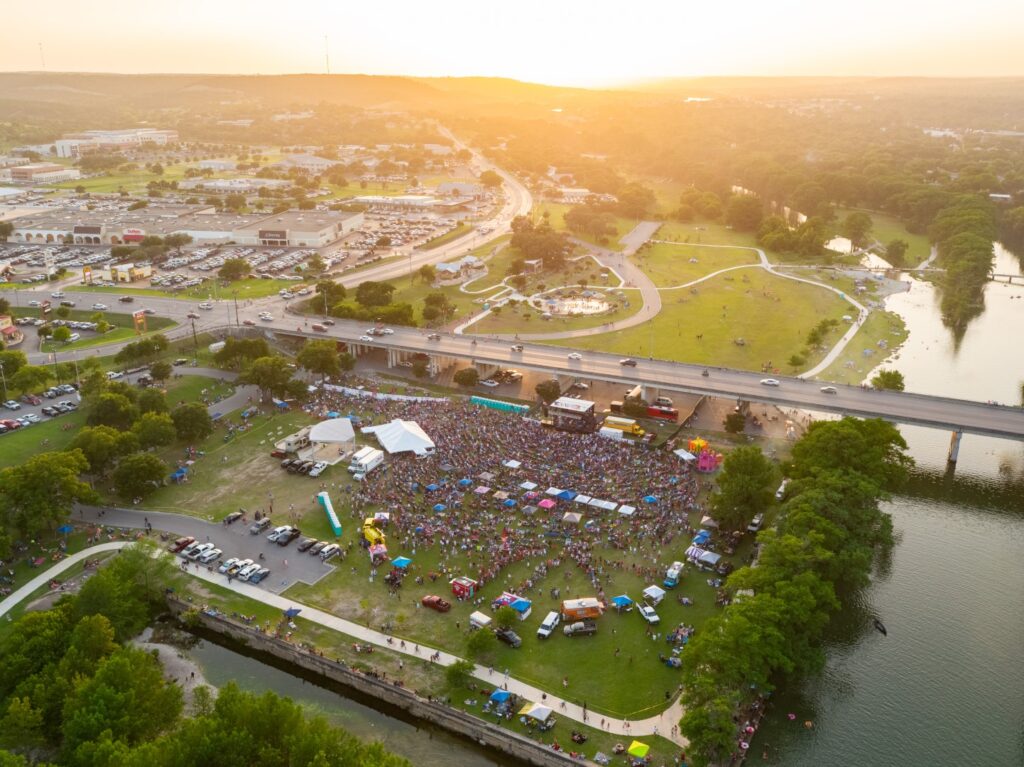
We’re building our fall crew for live event and sports coverage across the Texas Hill Country. No experience required — just curiosity, reliability, and a willingness to learn.
KerrvillePhoto.com, Kerrville.LIVE, and Texas Pro Sound & Video is a family of businesses operating as Kerrville’s home for professional live streaming and event coverage. From Friday night football to community events, we bring the action to audiences who can’t be there in person.
We’re a small, tight-knit operation that invests in our people. When you join our crew, we train you from the ground up — and we treat every team member like a professional.
What do we do?
25+ football games this fall including Tivy High School, Ingram Tom Moore High School, and Schreiner University
12+ additional sports broadcasts throughout the year, including soccer, track, and more
30+ community and corporate events throughout the Texas hill country
HD multicamera streaming, live and recorded video capture, IMAG, projection, LED screens, sound systems, and other multimedia support
Venues like Antler Stadium, Warrior Stadium, Arcadia Live, Happy State Bank Expo Center (ag barn), hotel conference centers, museums, university campuses, and more.
Crew Roles Available
Camera Operator
Man a professional camera on the sideline, in the stands, or at the press box. Frame the action and keep your shot steady under pressure.
Streaming Technician
Run the production board, manage software like vMix, switch cameras, and keep the stream live and stable from pre-show to final buzzer.
Graphics & Replay Operator
Manage on-screen graphics, scoreboards, lower thirds, and instant replays. You’re the behind-the-scenes layer that makes us look like a broadcast network.
Audio Technician
Run the sound board, manage sound on the stream and in the venue, integrate commentary, music, and ambient sounds to create a compelling show both in-person and online.
General Crew / Setup
Run cable, set up and break down gear, handle equipment logistics, and support the team. A great entry point that teaches you the whole operation.
What You’ll Do
On Event Days
Arrive early for setup of cameras, cables, and equipment
Operate cameras and streaming equipment under crew leader direction
Communicate clearly via headset with the production team
Monitor video feeds and flag technical issues immediately
Maintain camera stability, framing, and focus throughout the event
Break down and properly store all equipment after events
As you grow with us…
Operate streaming software (vMix, Tricaster) to manage live production
Switch camera feeds and manage replay clips during live broadcasts
Build and update on-screen graphics and scoreboards
Help train new crew members as your skills develop
Assist with equipment maintenance and pre-event checklists
Take on lead roles as experience grows
Requirement and Qualities We’re Looking For
Required of everyone:
Age 16 or older (parental permission required for minors)
Reliable transportation to event locations in and around Kerrville
Ability to stand, walk, and carry equipment for extended periods
Comfortable working evenings, weekends, and Friday nights
Strong work ethic and a team-first attitude
Ability to follow directions quickly in a fast-paced live environment
Professional appearance, calm demeanor under pressure
Preferred (but not required)
Any experience with cameras, video, or photography
Familiarity with streaming software (OBS, vMix, or similar)
Interest in sports, broadcasting, or media production
Computer literacy and comfort learning new software
Prior experience in any technical role or AV/IT setting
Attention to detail and strong situational awareness
Use the links above to apply or email Aaron Yates with any questions you may have. Thank you for considering a position with us! We look forward to meeting you.
We are proud to capture Ingram Middle School and Ingram Tom Moore sports photos for Spring 2026! Picture day dates are listed below.
March 2 — ITM Tennis
March 9 — ITM Baseball
March 16 — ITM Golf
March 20 — IMS Track & Field — 7 am
March 23 — ITM Track & Field — Girls at 3 pm, Boys at 4 pm
April 21 — IMS Tennis — RAINED OUT!
Additional dates will be added as we get them.
Online Ordering
We will be offering online ordering again this season. Online ordering allows our customers more options, packages, add-ons, and downloads, and orders are much more accurate and timely when parents/athletes choose themselves using our ordering portal.
When can we place orders? The photos will be uploaded to the system as soon as editing is complete, which is usually within 2 days of picture day. You can order as soon as you see the photos in the galleries linked above!
What is the ordering deadline? Each sport will have its own deadline that will be visible when you visit that gallery. Orders are accepted until that deadline with our discounted prices and free shipping to the school for distribution. After the deadline, orders will still be accepted, but the prices are higher, sales tax will be added, and shipping will be charged. So it’s best to get your order in before the deadline!
Where will my order be delivered? The orders will be delivered to the Ingram Athletic Booster Club representatives, who will then deliver them to the athletic department. Athletes should ask their coaches where to pick up their order envelopes.
What products are offered? Many different packages and products are offered, and downloads are also available. Your standard packages are available — the same packages we offered previously on paper order forms — as well as buttons, magnets, and more! Check the gallery page and select an image or set of images to see your options.
Do you accept cash or check for picture orders?Do you accept paper order forms? No, we only accept orders via the online gallery system. Multiple forms of payments are accepted there. But we do not offer any in-person ordering or payments. This helps us keep our picture day moving on-time, and keeps our prices as low as possible.
Other questions? If you have any other questions, send Aaron an email or text at aaron@kerrvillephoto.com or 830-377-9058.
Welcome, Warriors! KerrvillePhoto.com is proud to offer athletic photography again in 2025. We have made a few important changes to the ordering process, which we’ll explain, that will make ordering much more fun, intuitive, and flexible than ever before.
Photos will still be available for sale as printed prodcuts, specialty products (like buttons, magnets), or as digital downloads. The process is just a bit different.
This time, you’ll do all of your ordering AFTER the photos have been taken and uploaded to our website. This way, you can see EXACTLY what you’re ordering, and you get to make the decision about which pose you like the best!
Please note the ordering deadlines below for each sport. After the deadline, you can still order, but you’ll miss out on our special pricing and free shipping, making the photos a bit more expensive to acquire.
The link will appear below when the photos have been uploaded and are ready for proofing and ordering!
Ordering Deadline for Volleyball and Cross Country: Friday, October 3, at midnight
Ordering Deadline for Football and Cheer: Thursday, October 30, at midnight
What if I want to order the old fashioned way?
If you prefer to pay in cash or with a check on picture day, the traditional way we’ve handled most orders in the past, simply download the PDF form linked below, fill it out, and bring your payment and your form on picture day.
Please note: We no longer accept Venmo or CashApp for payment. Picture day orders will only be accepted with cash or check.
We are proud to provide the photography for Ingram Athletics and Athletic-Supporting Groups in 2025! IPI!
Photos will be available for sale to students and parents as prints and digital downloads, and will also be provided to the Booster Club for use in the program and other hype gear without cost.
Gallery Links
Links will appear here as soon as the photo galleries are ready!
If you haven’t placed an order before PHOTO DAY, you can still order online at a later date — even years later. However, these prices are typically higher than the advance orders, and you must also pay sales tax and shipping for these online orders.
After-Photo-Day orders are accepted via the online gallery linked above.
Receiving Your Order
If you place your order on or before PHOTO DAY, your printed products should arrive within about two weeks. The school and/or coaches will distribute your products to you or your student.
If you place your order through the gallery after the fact, you’ll receive a tracking number via email that will indicate when your products will arrive based on what shipping method you chose. Note that we don’t have control over this ordering process, so any issues you have will have to be resolved with the third-party processor.
Samples
Want a preview of what your images will look like? Here are a few samples below.
Individual Portraits
Memory Mate
Each Memory Mate will be customized with your team’s colors and logo, and each player’s name and jersey number, if applicable. Memory Mates are 8″ x 10″ and are perfect for framing.
Trading Cards
These cards are 2.5″ x 3.5″ printed on front and back. Content will vary depending on team.
Questions?
Reach out to photographer Aaron Yates at aaron@kerrvillephoto.com or via text message at 830-214-7635.
Thank you for inviting us to support Ingram athletics!
Your videos are available to view or download below. Please do not share this link with others. This link is solely intended for purchasers of the 2025 video set. Thank you for your cooperation!
The downloads are massive because of the length of the show, so be sure that you have enough hard drive space (and a good internet connection) before attempting to download. If a download fails, it’s usually because the internet connection was not strong.
Many computers or devices will have difficulty playing back some versions of the videos, especially 4K videos. If your machine won’t play back the downloaded files, consider viewing them using the embedded players above.
These files will be available for download for at least six months, but may be taken offline at that time.
For other questions, please email aaron@kerrvillephoto.com and we’ll get back to you as soon as possible.
Ranch real estate photography is one of the most rewarding (but also one of the most challenging) types of visual storytelling in the real estate world. Ranch properties are often remote, diverse in terrain, and rich with potential, which makes capturing their essence both an art and a logistical puzzle. In this post, we’ll explore some of the most important factors that influence a successful ranch photo or video shoot and the decisions agents and property owners must have to get the best results.
As with all marketing efforts, budget plays a key role in determining the possibilities for your shoot. While everything is possible with the right budget, often we present options that have given our clients the most bang for the buck over the years while avoiding some of the budget pitfalls that are unique to this genre of visual storytelling.
Aaron Yates has been in the ranch real estate marketing business since 2010, and has photographed thousands of property listings and created hundreds of videos portrating rural property. Prior to his filmmaking and photography business, Aaron worked as a land surveyor with his grandfather’s business since he was a child, giving him unique insights and a depth of experience into the land business that’s rare among his peers. These topics are real challenges, and we face them every single day.
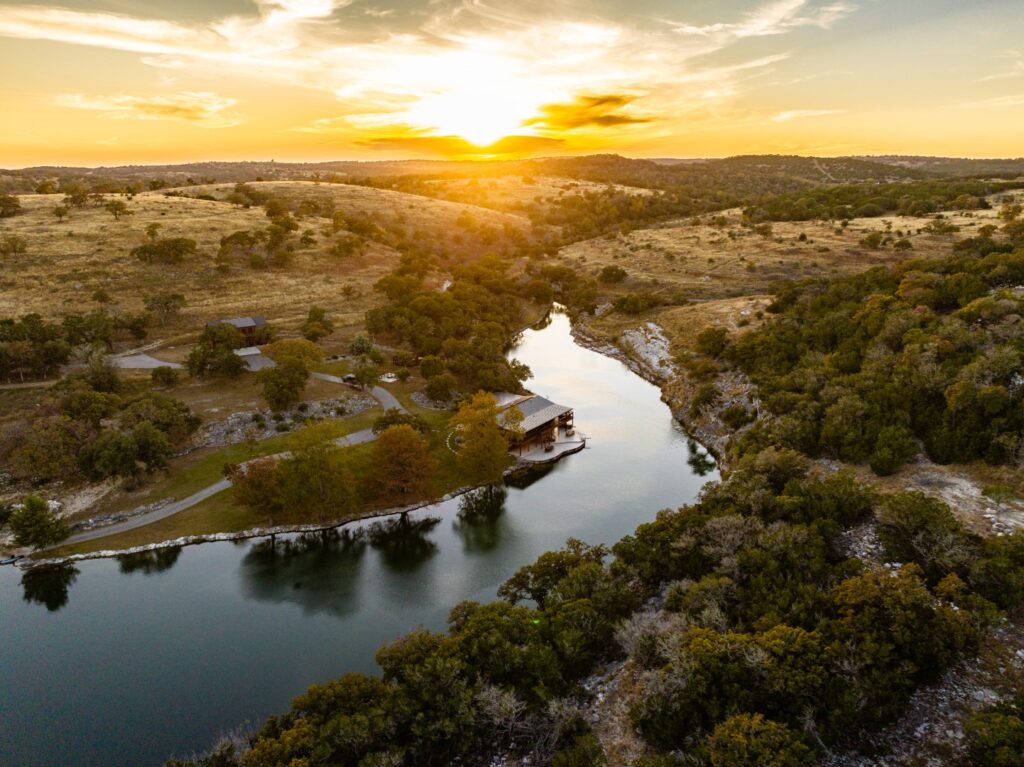
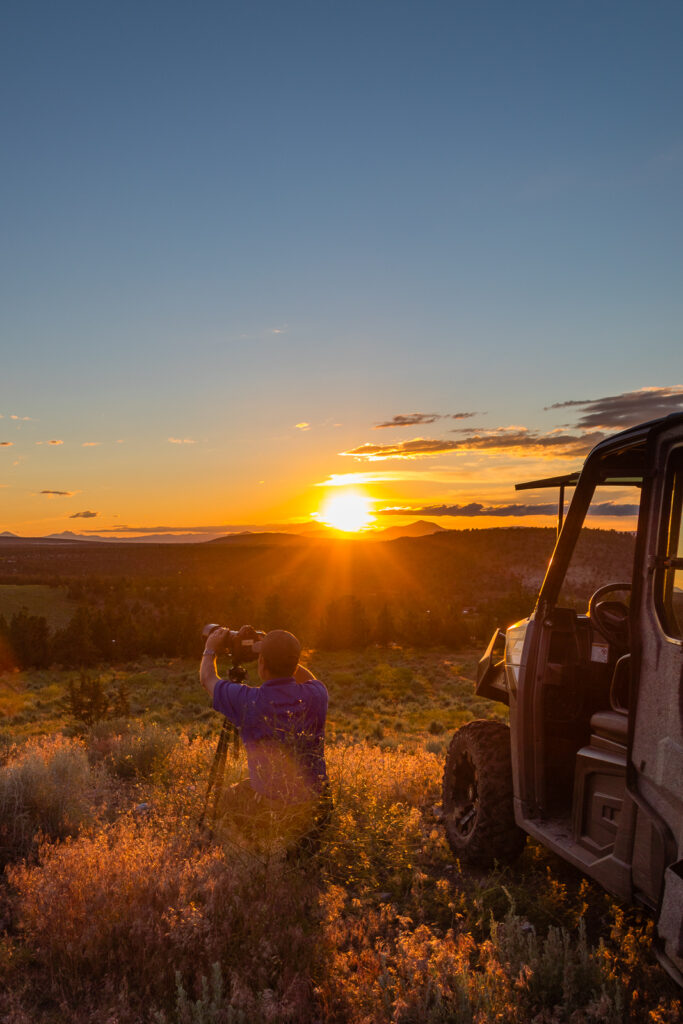
🌅 Timing is Everything: When to Shoot
Aerial shot of a sunset over a ranch listing.
The time of day has a dramatic impact on the final look of a ranch property. Most experienced photographers will recommend shooting during “golden hour” — early morning or late evening — when the sun is low and the light is soft and warm. This lighting adds depth, contrast, and a natural glow that brings out the texture of the land.
Trade-off: While golden hour yields beautiful results, it often requires either early travel or overnight lodging, especially if the ranch is remote. This will increase the cost of the shoot, but sometimes it’s worth it!
Shooting mid-day might be more practical logistically, but it can result in harsh shadows, flat colors, and less dynamic imagery.
Morning shoots are a special challenge, because weather is harder to predict in the mornings. Often overcast skies scuttle our plans for a good morning scene. And it’s far more difficult to get into position ahead of a sunrise, since it’s dark and hard to see the composition that we’re focused on capturing.
Recommendation: For very special properties or those that require extra attention and beauty shots, we recommend capturing a sunset rather than a sunrise.
🌤 Weather: Friend and Foe
Cloud cover can be a blessing or a curse. A light layer of clouds can act like a natural diffuser, softening shadows and reducing contrast—great for detail shots of improvements and interiors. But a thick overcast sky can make landscapes look dull and lifeless. On the other hand, bright sunny skies can make the land pop, but they also create deep shadows and overexposed highlights.
Rain or other precipitation makes this type of photography impossible. While we might still be able to capture the interior of some improvements, homes that have large picture windows or great views don’t show well in the rain.
Winds can be especially problematic for drone footage and exterior shots. High winds may delay aerial work, and even moderate breezes can make it hard to capture stills with natural elements like trees or water surfaces. Dust storms or heavy pollen in the air can also be a hidden enemy of clean visuals, and we have seen those often over the past few years.
Fix it in the edit: Clouds can be turned into blue skies during the editing process, but this is a tedious and time-consuming style of editing. Not only can it add significant cost to edit dozens of exterior photos this way, it’s not a cure-all. Sometimes the photos look fake even with lots of detailed attention. And views are obstructed because of the haze, which cannot be fully restored in editing.
Recommendation: Let’s have a backup plan in case of inclement weather and discuss how you see the tradeoff between great visuals versus timely scheduling and delivery. Putting off the shoot for a better weather day is usually a good idea, but certain times of year might cause significant delays due to high demands on our schedule or multiple clients all rescheduling during an extended period of bad weather.
👤 Should the Owner or Agent Be Present?
This is one of the most debated topics in real estate media. Having the owner or caretaker presentcan be a huge help sometimes: they know where the gates are, which roads are passable, where the best views are, and how to access key features. But their presence can sometimes slow the process if they’re too involved or indecisive. These days, thanks to detailed satellite maps being available to us, some of that assistance isn’t needed.
Agents, on the other hand, are usually focused on marketing priorities and may help guide the shoot toward what they think will sell — and can “run interference” to keep the owner from bothering the photographer too much. But again, if too many people are directing the photographer, it can dilute the creative process and lead to a less cohesive end product. Too many people and cars present on the day of the shoot can cause massive headaches as the photographer constantly has to direct people to stay out of the way, move cars around, and stay focused on the timeline of the shoot.
Best practice: Discuss goals in advance. A brief walk-through, map, or phone call before the shoot is often more helpful than hovering during it. If the owner insists on being present, let’s increase our shoot duration and budget accordingly for a more expensive project.
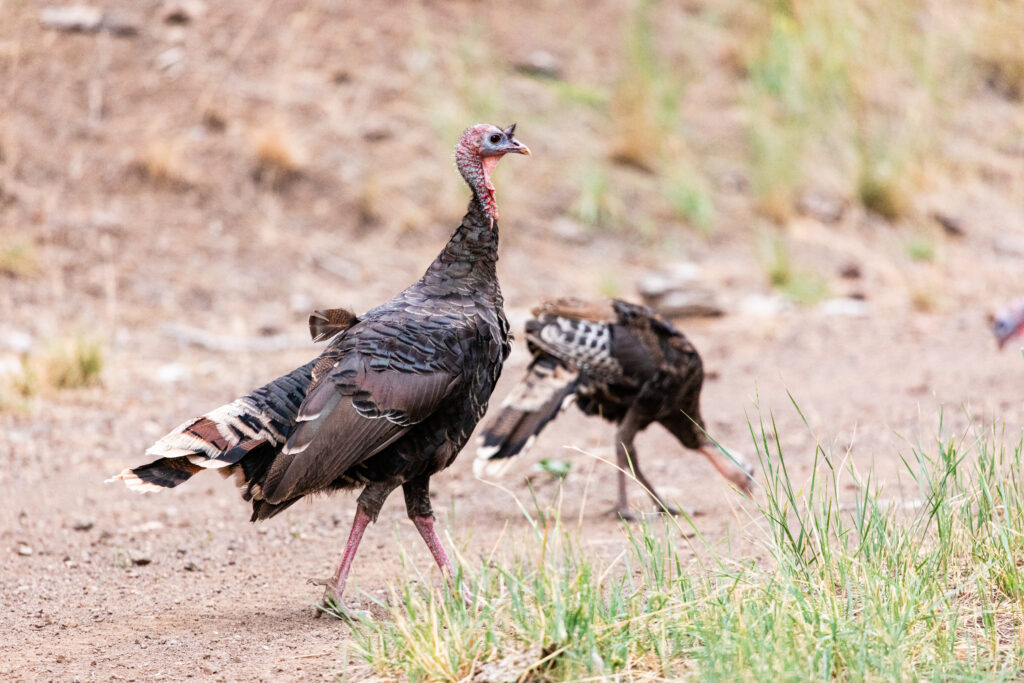
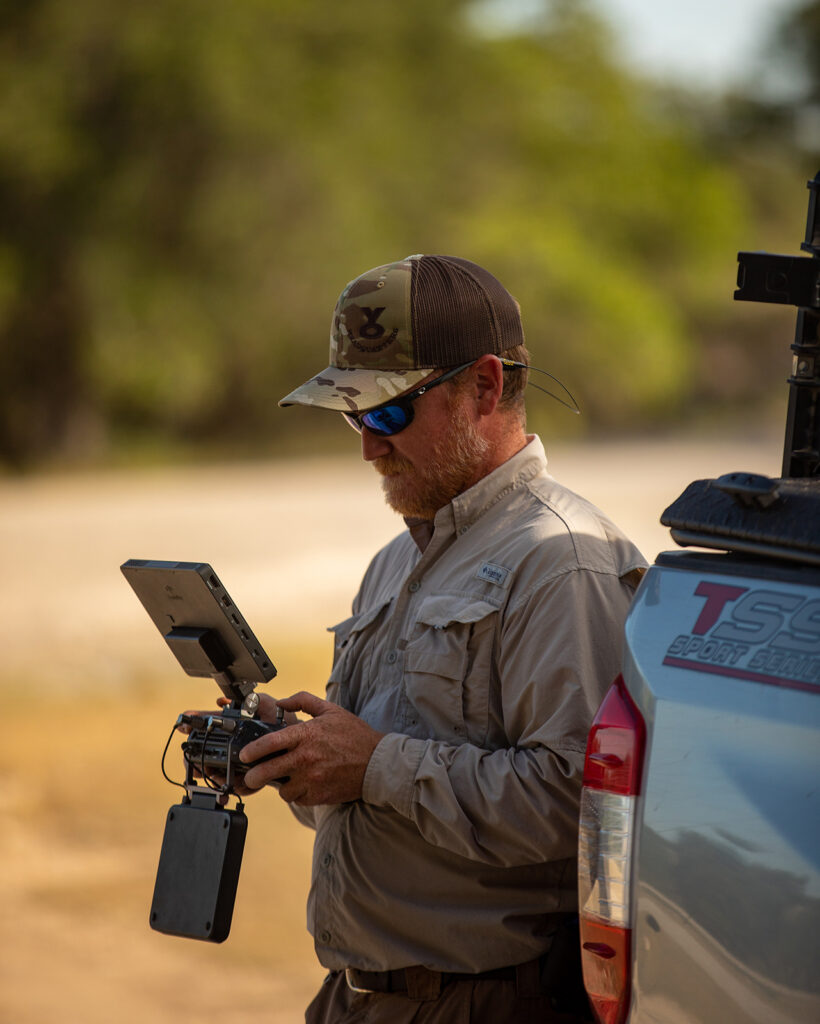
🦌 Capturing Wildlife: Patience, Luck, and Planning
Wildlife shots can elevate a ranch listing from average to exceptional. But getting a usable image or video of deer, turkey, exotic species, or native birds takes more than just showing up.
Photographers must often scout the land, find water sources or feeding areas, and be ready with long lenses or motion-triggered gear. Even then, it’s often a game of patience and timing—or just good luck.
Riding around in a Polaris with a long lens sometimes yields great results, but again, it’s a game of chance and is often dependent on being at the right place, the right time of day, with an experienced wildlife photographer and guide.
Tip: If wildlife is a major selling point, consider scheduling plenty of time for a dedicated wildlife shoot with the right equipment and expectations.
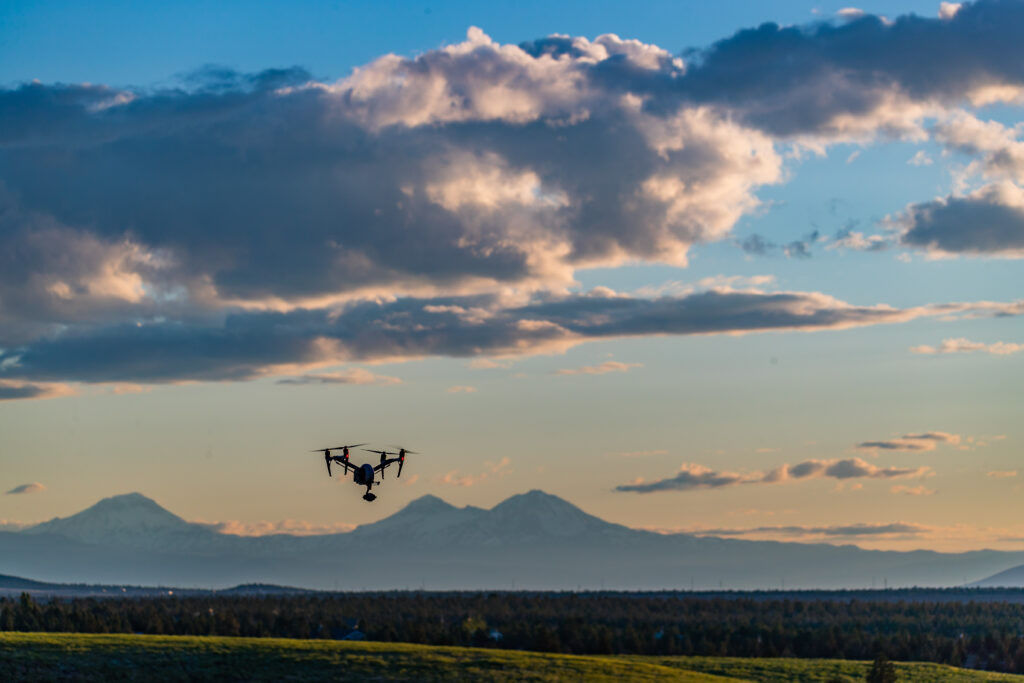
🎥 What Kind of Video is Best?
Aerial photography and videography services.
Not every ranch needs a cinematic masterpiece. The right style of video depends on the type of property and the quality of improvements:
Raw land benefits from aerial drone work, landscape shots, and storytelling about potential use, sometimes combining footage of wildlife or game animals in the story.
Improved properties with homes, barns, or water features call for smoother gimbal shots, interior walkthroughs, and detailed editing. These types of properties take much longer to capture and edit, which increases our budget and time needs.
Luxury ranches may deserve a full narrative experience, complete with music, lifestyle footage, and voiceover narration. While these are usually the highest quality and most popular with buyers, they require next-level planning and execution, lots of cooperation between photographer, agent, and other stakeholders, and a large budget.
🎙 Is Narration Necessary?
A narrated video can add professionalism, guide the viewer, and provide context, but it’s not always needed. For some properties, music and text overlays are sufficient. However, narration can be a great tool for:
Properties with historical significance
Ranches with unique development potential
Listings where out-of-state buyers are common and may not be familiar with the area
Ultimately, narration adds to the budget, but it also adds clarity and polish when done right.
📍 Other Considerations for a Smooth Ranch Shoot
Map Overlays & Graphics: Help orient viewers with labeled aerial maps or animations. Please provide us with a LandID link, or better yet, export a KML file from your platform so that we don’t have to recreate your boundary lines and points of interest.
Access & Roads: Ensure trails and gates are passable before the shoot day. Provide gate combos when possible. If it’s muddy, do we need to postpone?
Animals & Livestock: Let us know about any specific concerns about wildlife or livestock. Are there breeding pens that we need to avoid? Dangerous animals of any kind, including dogs?
Seasonality: Spring green-up, fall foliage, or after a good rain often makes the land look its best. Of course, these are the times when our schedule tends to be the most booked, as everyone would love to shoot in the beautiful greenery of spring or the color pop of fall.
Final Thoughts
Ranch real estate photography is more than just flying a drone over some acreage—it’s about telling the story of the land. That story changes with the light, the season, the weather, and even the people involved in the shoot. With the right planning and creative approach, even the most rugged ranch can be presented with style, professionalism, and market appeal.
Welcome! Picture Day for the 2025 club teams will be Sunday, April 6, with the exact schedule and lineup posted below. On this page, you’ll find ordering information, payment link, and samples of previous years’ images.
Shooting Schedule
2:00 PM – ALL TEAMS – One massive group picture of all of the players and coaches involved in Axis volleyball this year.
2:20 PM – 13U – 9 players and 2 coaches
2:50 PM – 14U – 10 players and 2 coaches
3:20 PM – 15U – 11 players and 2 coaches
3:50 PM – 16U – 9 players and 2 coaches
4:20 PM – 17U – 9 players and 2 coaches
Ordering Options
Axis photos are sold as ALL DIGITAL packages, meaning the buyer will have access to all of the digital images in which their player appears. Multiple poses, small group shots, specials, and team images. You can use these digital files to print anywhere you’d like, and you can also use them on social media.
Each digital package is $40, payable by cash, check, credit card, or Venmo. We will have a person accepting payments and making change on the day of the shoot. You can also pay via Venmo in advance using the payment link below. If Venmo asks for a phone number to verify, please use 830-214-7635.
All photos will be delivered via our online gallery as soon as editing is complete. If you have paid for an order, the images will appear in the online gallery and you will be able to right-click and save (or long-click on most phones/tablets) any size from small up to full/high resolution.
Information regarding scope, costs, and setup for multimedia services at the 2025 event at the Happy State Bank Youth Exhibition Center in Kerrville, Texas, on Saturday, May 17, 2025. This page will be updated as the scope and planning evolves.
Previous Year’s Scope
In previous years, we have provided the following:
Two projectors and screens (12 feet wide by 9 feet tall)
Event production technician to operate the screens and push content to screens and sound system
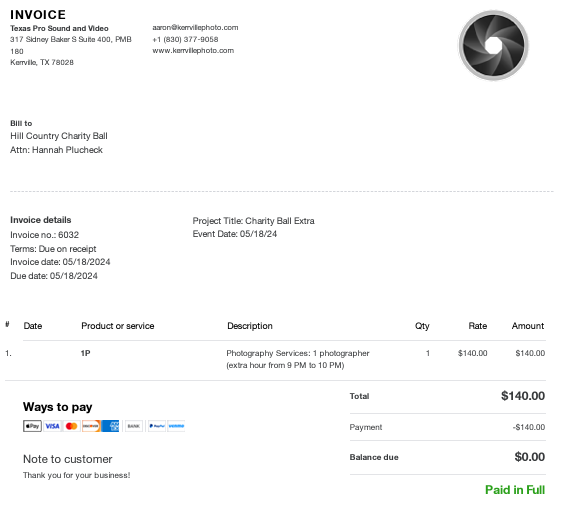
Photographer capturing “prom style” guest photos in front of a backdrop built/provided by HCCB (6 pm to 10 pm)
In previous years, the budget has looked like this. Here is a copy of the two invoices from 2024. A second invoice was submitted to increase the hours of photography. The two invoices together totalled $2,010 after discounts.
Proposed Changes for 2025
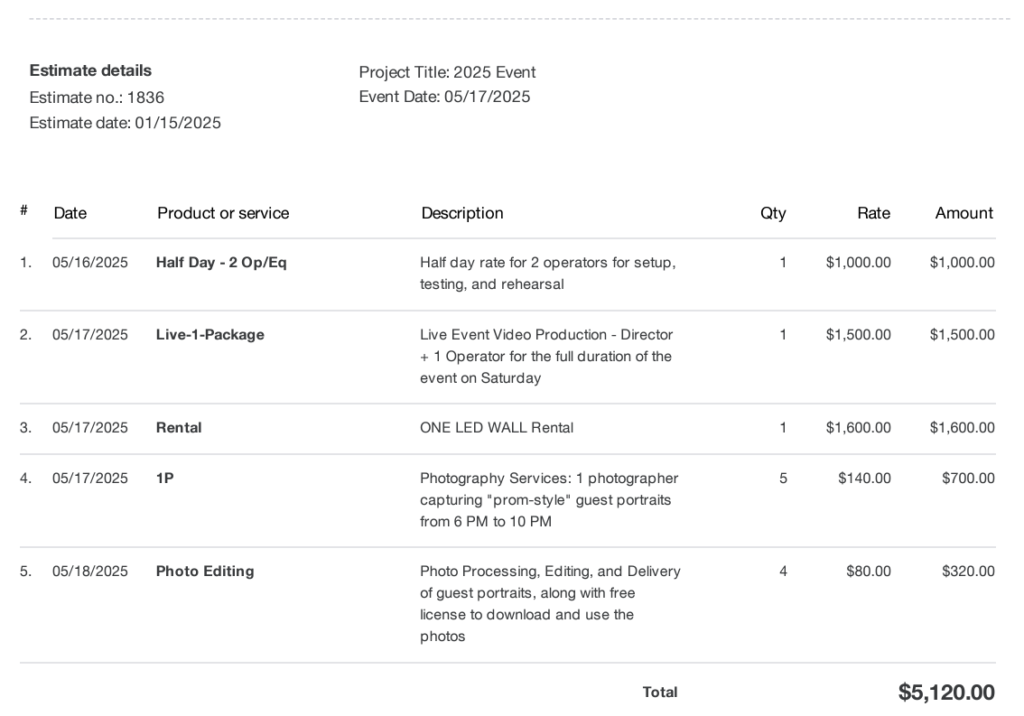
Here is the newly requested scope for 2025:
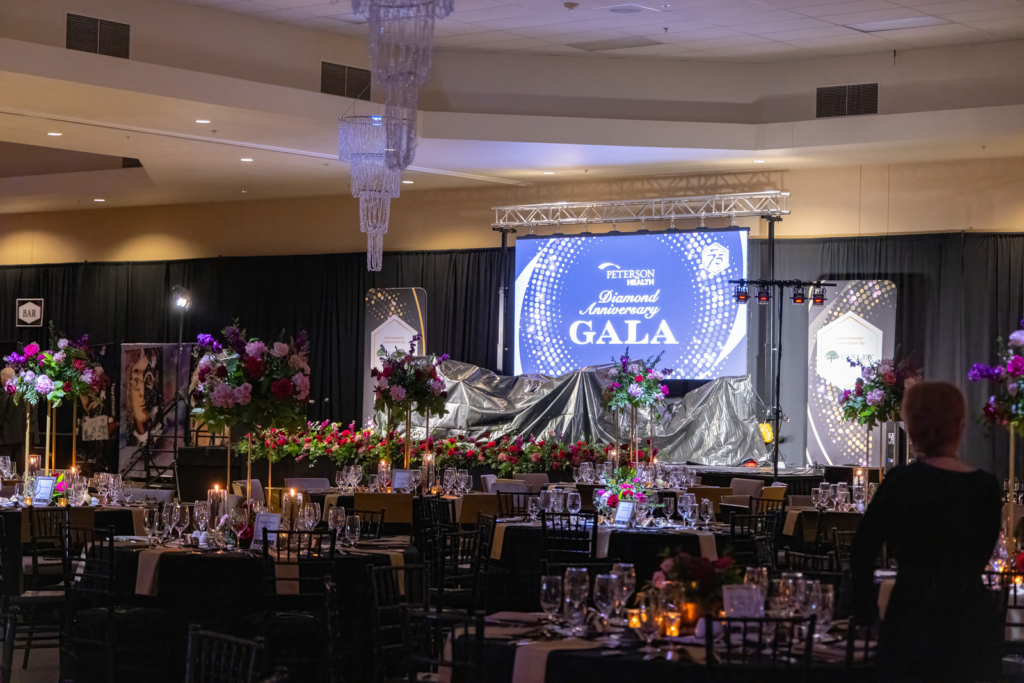
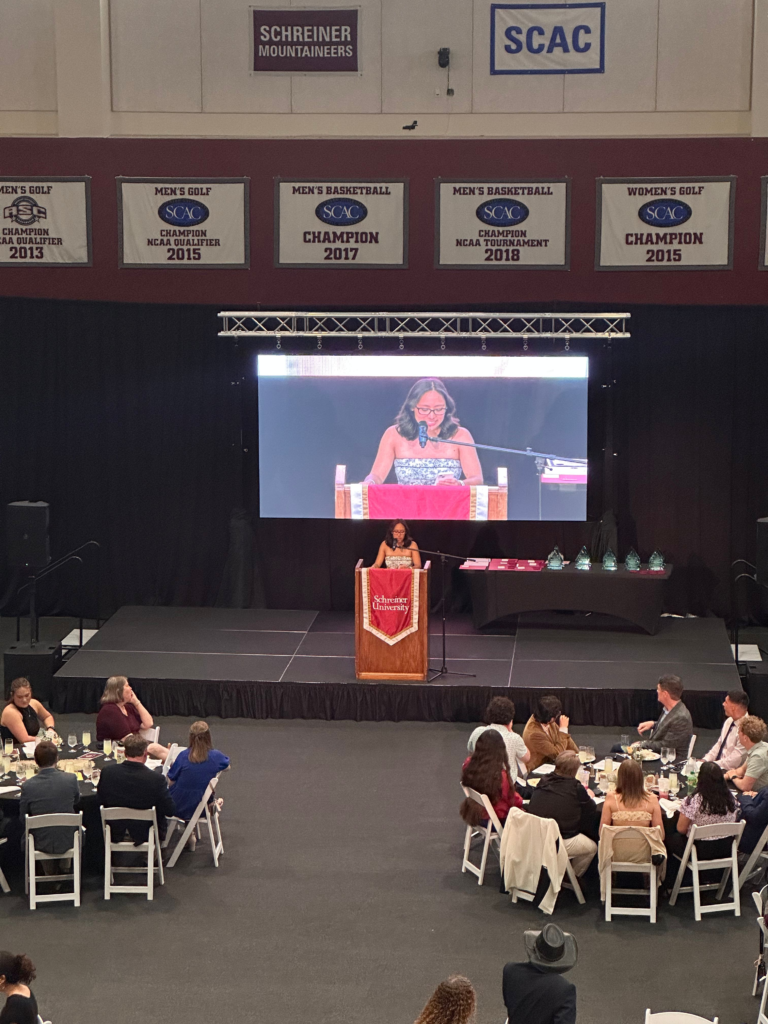
1 or 2 LED walls (screens) for displaying content (more about LED walls below)
Event production technician to operate the screens and push content to screens and sound system
IMAG (image magnification) – Live camera view to be used on screens at various points in the program when appropriate
Recording – Along with IMAG, we always record the camera shot for posterity
Photographer capturing “prom style” guest photos in front of a backdrop built/provided by HCCB (6 pm to 10 pm)
Budget for 2025
Based on the scope above, the approximate budget would be substantially increased due to these facotrs:
The addition of the LED wall and IMAG require a lot more labor to setup and test the equipment, requiring a half-day of installation on the Friday before the event. This will be coordinated with the LED rental provider. This is also a good time to schedule a rehearsal or a run-through once all of the gear is situated.
This estimate includes just ONE LED wall, which can be positioned behind the stage. Adding a second LED wall and positioning them on each side of the stage would add another rental fee of at least $1,600 (we’d need to check on this with the KROC Center to make sure the second screen is the same price)
The “day of” price has increased for the extra staffer and equipment needed to run the IMAG setup.
The extra hour of photography has been included in this initial estimate, giving us four hours of total capture time from 6 PM to 10 PM.
Full estimate pasted below, totaling $5,120 before any potential discounts.
LED Wall versus Traditional Projection
This year we’ve introduced the option of using an LED wall instead of the traditional projectors that we’ve used in years past. The LED wall is superior due to the reasons below, but is more expensive. We are unable to discount this rental fee unless the KROC Center is willing to provide it to you at a discounted rate.
LED walls are brighter and sharper, providing a much higher quality image that is more easily readable from a distance
The footprint is much smaller because there’s no need for a 16-foot empy space for the projector beam.
LED walls can be placed flush with the pipe and drape, taking up less room and allowing for more tables or other floorplan items
LED wall can be placed at the back of the stage, if desired, to focus the audience’s attention on one focal point rather than to each side of the stage.
The images below show the single LED wall placed at the back of the stage, along with IMAG of the presenters.
Ranch Name 10 Acres Medina, TX Agent Tristan Flores and Garrett Daley Phone 2106187585 Email tflores@texasranchsalesllc.com Acres 10 County Bandera City San Antonio State Texas Map https://id.land/ranching/maps/0cb3ebd7b68fd379690fbc9fdf871423/share Earliest Available Date Improvements Yes Overview Rare opportunity to own a hill top home that you won’t find anywhere else in the Texas Hill Country! 1934 classic hill country home that has been restored and remodeled. The 10.218 acre property features total privacy, multiple million-dollar views of Medina and the surrounding hill country which the home overlooks. Electric gate entrance with a recently completed driveway leading to a pond and pasture area and entrance to the hill top estate. The 3/2 home features renovations including new sinks, counters, and toilets as well as plumbing. The master bath includes an upgraded steam room/ sauna system. The water/septic system has been updated with a new water heater, water softener, and carbon filtration system in the well house as well as a new septic system recently completed. The property has a new game fence that surrounds the perimeter of the property. Roaming the property are 5 exotic mouflon and red sheep rams that can convey with the property.
This Media License Agreement (the “Agreement”) is made and entered into as of the date of delivery of the digital images (the “Effective Date”) by and between Aaron Yates (the “Photographer”) and the undersigned Client (the “Client”).
1. Grant of License The Photographer grants the Client a non-exclusive, non-transferable license to use the digital images and videos (the “Images”) solely for the purpose of marketing and advertising the property (the “Property”) listed for sale or lease in connection with the Client’s real estate business. This license is limited to use on the Multiple Listing Service (MLS), real estate websites, social media, and other promotional materials (digital or printed) directly related to the Property. Neither Client nor Photographer can transfer this license to another party without consent of Photographer and Client. Photographer retains the right to use the images produced under this agreement for marketing of his photography and videography services on his own website and social media channels.
2. License Term This license is valid only for the duration of the listing agreement between the Client and the Property owner. Upon termination or expiration of the listing agreement, the Client’s rights to use the Images cease, and the Images must be removed from all marketing materials and platforms.
3. Restrictions (a) The Images may not be sold, licensed, or transferred to any third party, including subsequent real estate agents, property owners, construction contractors, or marketing firms. (b) The Images may not be edited, altered, or manipulated without prior written consent from the Photographer, except for minor cropping or resizing for marketing purposes. (c) The Images may not be used for purposes other than those specified in this Agreement, including but not limited to commercial advertising, stock photography, or resale.
4. Copyright and Ownership The Photographer retains full copyright and ownership of all Images. This Agreement does not transfer any copyright or intellectual property rights to the Client.
5. Indemnification The Client agrees to indemnify and hold the Photographer harmless from any claims, damages, or expenses arising from unauthorized use of the Images or any breach of this Agreement.
6. Termination The Photographer reserves the right to terminate this license if the Client breaches any terms of this Agreement or if the invoice for services is not paid on or before due date. Upon termination, the Client must immediately cease using the Images and remove them from all platforms.
7. Governing Law This Agreement shall be governed by and construed in accordance with the laws of the state of Texas and United States Federal Copyright Laws, without regard to its conflict of laws principles.
8. Entire Agreement This Agreement constitutes the entire understanding between the Photographer and the Client regarding the subject matter hereof and supersedes all prior agreements, understandings, or representations, whether written or oral.
By downloading and using the photos, Client hereby agrees to the terms of this agreement.